


Showing posts with label diy. Show all posts
Showing posts with label diy. Show all posts
Tuesday, December 11, 2018
Monday, March 9, 2015
P.H.D. completed? ....
...Project Half Done that is. I love zipper bags. My zipper bags have zipper bags. I use them for everything. I have my make-up in 3 or 4 zipper bags, (yes organized, eyes, lips, etc ...) however, most of that I don't use everyday but I pull out my make-up bags & they sometimes end up on my counter for a day even though it takes 2 seconds to put them back in the cabinet. I don't like that. If you are a Follower of my blog you might already know about my "Hidey Holes", they are places I put things in so things are out of sight, just one tiny example is a antique large green bell pepper cookie jar filled with vitamins, aspirin, cough syrup, etc... in my kitchen, that jar would be classified as a "Hidey Hole", a medicinal hidey hole. hahaha Basically they save me, I can have lots of crap but not look like it. haha True story. When I was a kid my Mom had us shove clutter from the coffee table under a couch cushion when company came calling. hahaha In her defense, she was married to Dad who doesn't like his clutter touched & had 4 kids, personally I thought it was brilliant at the time.
3 years ago (I know, craft hoarder) I saw this ugly worn jewelry box at the thrift store for $5. (The picture doesn't do it's homeliness justice, I thought $5 was a lot for it.) I also thought it might be perfect to put my everyday make-up/facial things in and a few pieces of costume jewelry or what nots - basically a new Hidey Hole for my dressing area.

When I got it home & started painting. First primed it with white.

I drew out flowers, and painted it black.I didn't like the flowers.

So I changed the flowers to Hydrangeas, which I love.


Then I decided I didn't want that for make-up. I like my zipper bags, they take up less space and swore off leaving them on the counter. So I just put it in it's own hidey hole and left it. Well I pulled it back out a few weeks ago and decided I finish it and if I didn't want it I would just re-donate it or give it away. But as I was finishing it I thought I would use it to house lots of sewing notions that I grab often, bobbins, rippers, stuff that .


I liked it black and may turn it back to black...


...but for now I am leaving the pop of red color on it.

I still have to varnish it or wax it...one day...
I hope this inspires you to make something new again!
Blessings
Saturday, August 31, 2013
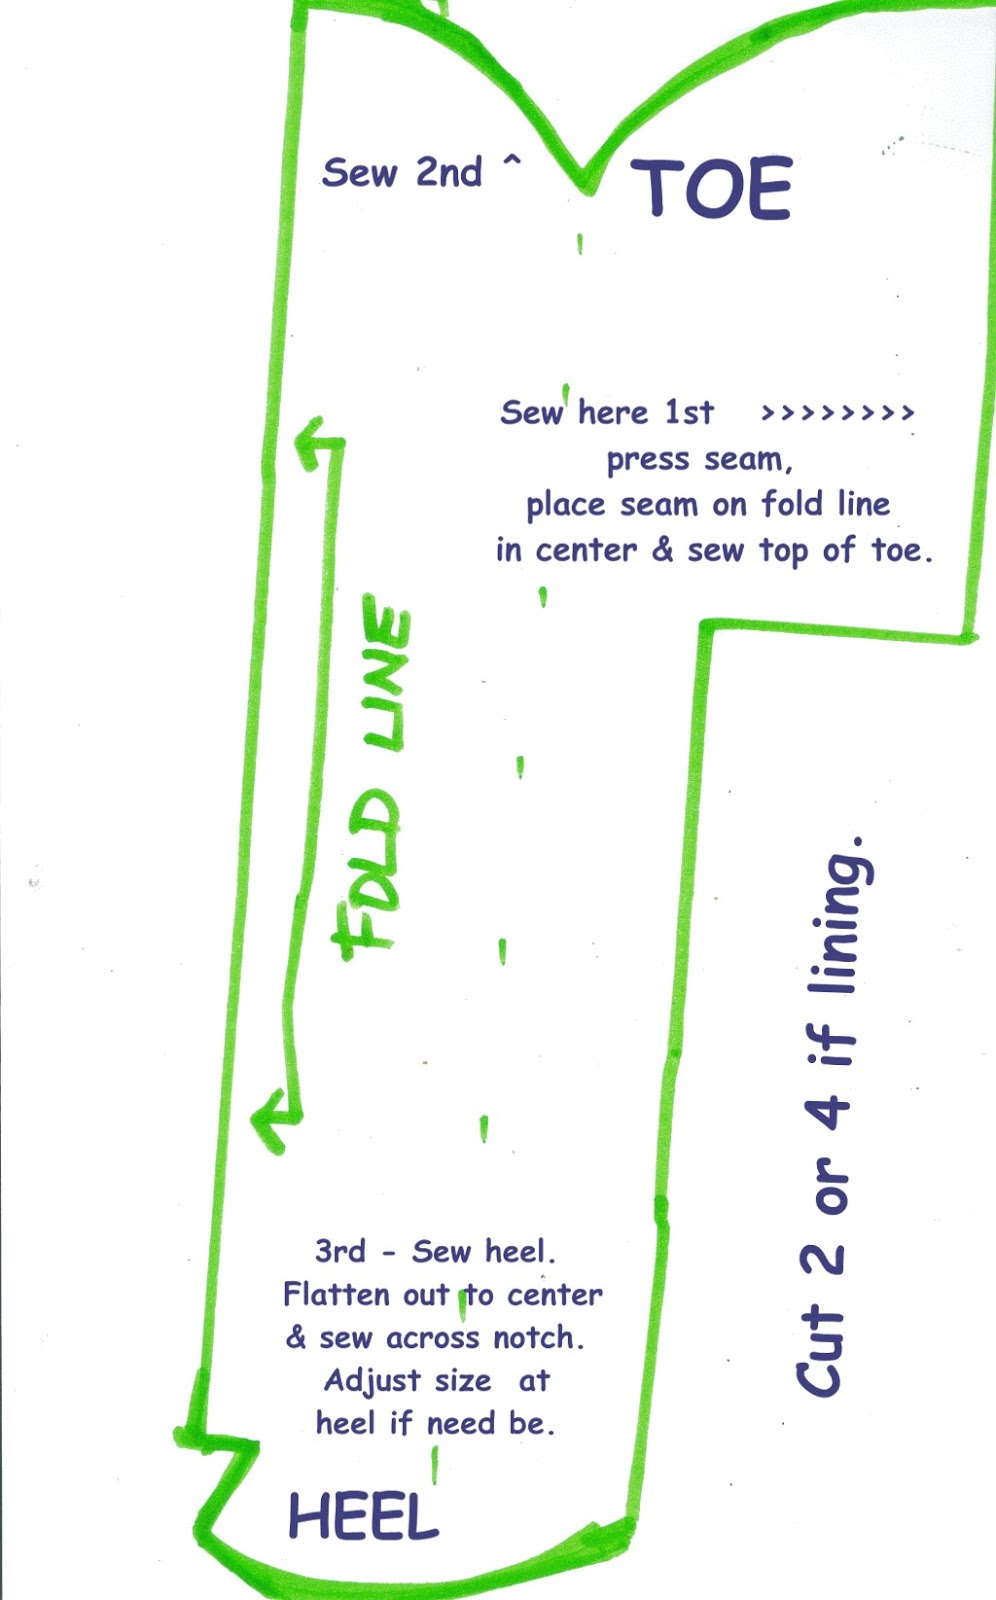
My Custom Fit Slipper Pattern...
...Here is a little gift for you! I made this slipper pattern and I love them. They are so easy to make, take little fabric and fit like a glove. I hope you make some & enjoy them as much as I do!

Approx 1/2 yard of main fabric & 1/2 yard for lining.
Print out pattern. Fold additional piece of paper in half & cut out. Open up & place foot on pattern to check fit with your foot. Enlarge or reduce if necessary making sure to leave a seam allowance. This pattern fits a 7 to 8. I suggest making a practice slipper with muslin or scrap fabric to use as your own custom fit pattern in the future. (Right click on pattern & save to your desktop, then print.)

Cutting fabric on the bias will give you more stretch with heavier fabrics.


Staystitch around toe to check fit before sewing permanent seam.


Check fit again and adjust as necessary. *At this point you will have a pattern
for your own foot. You carefully take apart and trace to keep for future use.


*** PLEASE RESPECT THIS FREE GIFT.
THIS PATTERN CAN NOT BE SOLD AND IS FOR PERSONAL USE ONLY. ***
Saturday, February 9, 2013
Happy New Year Again!
Chinese New Year starts Feb 10th. When I'm not painting I'm sewing or have some kind of needle in my hand. I have so much fabric it's shameful. I decided I better start doing something with it or else... This is the project I just finished and can't wait to start the next one! Some of my next projects may include painted fabric or some of my art printed on fabric.
"Happy New Year"
A beautiful butterfly soars & red Chinese lanterns flutter in the wind over a quaint Chinese village celebrating the New Year.
I was inspired by a piece of designer fabric by Kaufmann, a Chinese Toile. It started a daydream. The print looks like a rural chinese festival & tea party.
I started with a vintage GUESS George Marciano denim jacket I was lucky to find at the local 2nd hand store.


I cut red circles out of fabric then bleached a portion of them for the bottom of the lanterns. Free motion embroidery was used to attach the strings & to complete the lanterns. I added sequins & rhinestones. A pretty blue denim butterfly was on a piece of fabric my sister had sent me that matched perfect! I added it for a little perspective. We are soaring over the festival! I attached the entire piece as close to the seam as possible with a black machine blanket stitch. The lanterns swing from strings of vintage black velvet that has a glitter print that just twinkles in the light, sequins & diamond like rhinestones top the lanterns. I used different colored sequins for the strings of the lanterns. I had put a butterfly at the top of the jacket too but I ended up removing it. Maybe I will make me one too, I would wear it to San Francisco when we go have Dim Sum!
I hope this inspires you to dive right in & cut something up!
Happy Chinese New Year!
Subscribe to:
Posts (Atom)


